Refinish Hardwood Floors in One Day: How to Refinish Wood Floors Step by Step
Restore your wood floor on a Saturday—and still have time to play!

- Time
- Complexity
- Cost
- A full day
- Beginner
- $51–100
Step 1: Buy special hardwood floor refinishing kit
If the finish on your wood floor is worn and lightly scratched, you can make it look like new without the labor, mess and expense of sanding off the finish. This story will show you how to refinish hardwood floors and add a new coat of finish directly over the old by first applying a liquid that roughens the old finish so the new finish can bond to it. Unlike waxes or other hardwood floor refinisher products that provide a short-term shine, this added coat will last for years and extend the life of your floor. You can use this method on wood floors that you would otherwise sand or on flooring that’s difficult or impossible to sand, such as prefinished or laminated wood. You can even use it on plastic laminate flooring such as Pergo.
Professional floor refinishers have used this “chemical etching” process for years, and now there’s a system designed for the floor-finishing novice. The Varathane Renewal Floor Refinishing Kit includes enough liquid etcher and urethane finish to cover about 225 sq. ft. of flooring, plus an applicator block and pads. The finish dries slower than most water-based floor finishes, making it easier to use. The hardwood flooring refinishing kit is available at Lowe’s and some other home centers. Or find it online.
Is This System Right for Your Floor?
This refinish hardwood floors process will make some floors look absolutely perfect. Others will look much better, though not quite perfect. Still others are not good candidates for this process at all and require sanding instead. The category your floor falls into depends on the amount and type of damage it has.
- Normal wear and shallow scratches in the finish only (not the wood) are no problem; they’ll disappear under the new coat of finish.
- Deeper scratches that go through the finish and into the wood won’t disappear completely, even if you touch them up with stain (Photo 8). A shiny new coat of finish may even accentuate deep scratches and dents. There’s no harm in applying new finish over these spots. But if your floor has a lot of deep damage, sanding is your best option.
- If you have heavy traffic paths where the finish is completely worn away or areas where the finish is flaking off (often caused by water damage), don’t use this process. The etching chemical can discolor bare wood and won’t remove water stains.
- If your floor has been waxed or has a wax finish, the new finish won’t stick. To check for wax, find a low-traffic spot behind a door or near an inside corner. Place a few drops of mineral spirits on the floor; let it stand for two to three minutes, and then wipe it off with a clean white rag. If the rag shows any brown or shiny residue, you’ve got wax. In that case, sanding is your best option. Alternatively, you can buff on a fresh coat of wax for a fresh, although temporary, shine.
Step 2: Clear the floor and clean the room
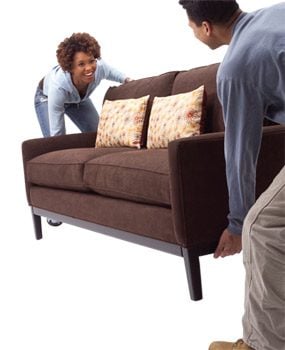
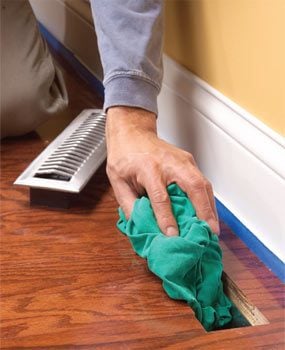
To get started, remove all the furniture from the room. Then clean the room to make it as dust-free as possible. Dust in the air can mar a smooth finish by landing in the wet finish and creating “whiskers” as the finish hardens. To limit air movement, close windows, turn off the ceiling fan or window air conditioner, and block any ducts in the room (Photo 2). Next, give the room a top-to-bottom cleaning. Vacuum curtains and wipe down baseboards, windowsills and any other horizontal surfaces with a damp rag. Vacuum the floor, then clean it with a damp rag. Scrub off any stubborn gunk using a gentle abrasive pad such as a Scotch-Brite sponge. Finally, close curtains at any windows that allow direct sunlight to shine on the floor—that can create hot spots on the floor and cause the finish to dry too quickly.
Step 3: “Sand” the floor with liquid
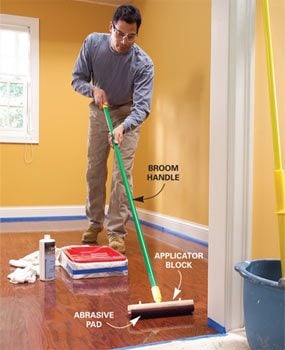
Once you’re done cleaning, the floor is ready for liquid etcher, which roughens the surface (Photo 3). The etcher has very little odor, but if you want ventilation, open a window or turn on an exhaust fan in another room. Attach the abrasive pad from the kit to the wood applicator block and screw a broom handle into the block. Slip a shallow cardboard box into a plastic bag, set a paint tray in the box and pour in the etcher (the box catches drips and spills from the tray). Dip the pad in etcher and then press the pad against the tray to squeeze out the excess. Don’t just mop the etcher onto the floor; scrub firmly with the grain, making sure you pass over each area several times. That way, the abrasive pad lightly scratches the finish, creating a rougher surface than the etcher alone would provide.
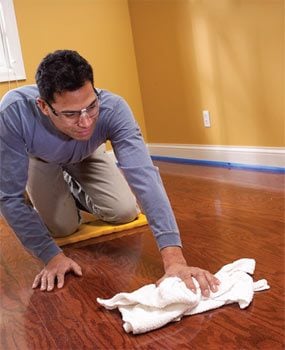
Left on the floor too long, the etcher can seep into cracks between flooring strips and damage the core of laminated flooring. To prevent this, work on small sections that you can complete in about five minutes (start with a 4 x 4-ft. area to get the hang of it). Wipe up the etcher with an old towel as soon as you’re done scrubbing (Photo 4). You don’t have to wipe the floor absolutely dry; just wipe up the excess etcher, leaving a light film of liquid on the floor. When the whole floor is done, remove the abrasive pad and rinse the applicator block and the paint tray. Let the floor dry for 30 minutes before the next step.
Step 4: Damp mop and touch up the floor
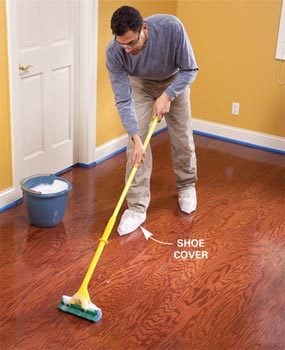
When the etcher is dry, mix 2 tbsp. of dishwashing liquid in a gallon of warm water. Slip on the shoe covers and damp-mop the floor (Photo 6). This final cleaning removes any remaining residue and neutralizes the etcher. Water can damage flooring, so work in sections and wipe up puddles immediately just as you did with the etcher.
Let the floor dry and then give it one last inspection before you apply the finish. Now’s the time to fix scratches Photo 8). Dab on matching stain using an artist’s brush, then blot the excess stain with a rag. Blow-dry the stain for about one minute with a hair dryer. Then seal the stain with floor finish from the kit. Apply a very thin coat of finish with an artist’s brush and “feather out” the edges to avoid visible ridges around the patch. This repair might not be perfect, but if it’s done reasonably well, you’ll be the only one who knows it’s there.
Step 5: Apply the new finish…fast!
Rejuvenate Hardwood Floors
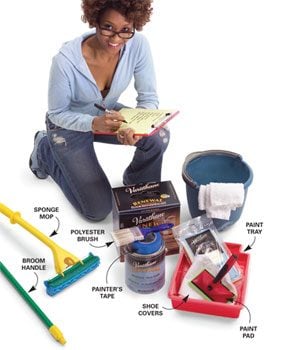
The “waterborne urethane” finish included with the Renewal kit dries fast, though not as fast as most other water-based finishes. After spreading it on the floor, you have five to 10 minutes (depending on the heat and humidity) before it becomes gummy and impossible to smooth out. So line up a helper and make sure all your equipment is ready before you begin. Attach the applicator pad to the block and prepare your paint tray just as you did before. Also have a paint pad and a 3-in.-wide polyester paintbrush handy for your helper.
Tip: To make the applicator pad, brushes and paint pads more pliable and responsive right from the start, rinse them in water, then dry them until they are just damp to the touch.
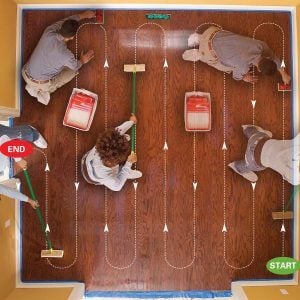
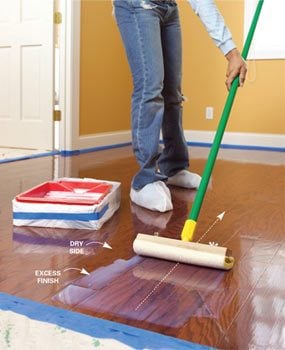
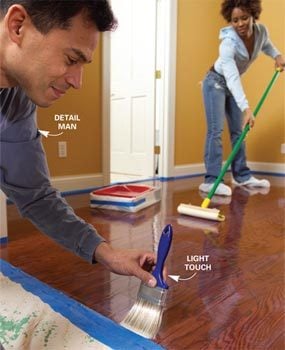
Give your helper a short head start applying finish along the baseboards with the paint pad. Then follow close behind with the applicator pad. Dip the applicator into the paint tray, but don’t squish out excess finish as you did with the etcher—that creates bubbles. Apply and spread the finish using as few strokes as possible. With beveled-edge flooring, you may need to make multiple passes, but one steady pull is usually all it takes. The trick is to keep the pad wet. Ideally, as you apply the finish, you want a little excess to puddle on the “unfinished side” of the floor. On your next pass, switch the angle of your attack so that the applicator snowplows the wet finish across the room. Have your helper smooth out drips and puddles with a brush so you can keep moving (Photo 11). Don’t worry about the milky, uneven color of the finish. It will become clear as it dries.
Resist the urge to fix imperfections after the finish becomes sticky. This almost always does more harm than good. If you notice a drip after it’s too late to fix, just let it dry completely, then carefully slice off the bump with a razor blade.
If the original finish had only light wear and fine scratches, one coat of finish may be enough to restore the floor’s brand-new look. But in most cases, a second coat is a good idea; it will hide deeper scratches that show through the first coat and will protect the underlying wood better. The kit contains enough finish for two coats over 225 sq. ft., but check the can to make sure it’s at least half full. If not, buy another gallon of Varathane Diamond Water-Based Finish for Floors. Apply the second coat following the same steps you took with the first coat.
Your final finish will be hard enough for “sock traffic” after eight hours, and ready for you to move furniture back after 24 hours. Give your floor two weeks to completely cure before putting down an area rug.
Required Tools for this Project
Have the necessary tools for this DIY refinish hardwood floors project lined up before you start—you’ll save time and frustration.
- Bucket
- Paint tray
- Paintbrush
- Shop vacuum
Required Materials for this Project
Avoid last-minute shopping trips by having all your materials ready ahead of time. Here’s a list.
- Floor refinishing kit
- Nylon abrasive pad
- Oil-based stain
- Painter's tape
