How to Build a Deck That will Last as Long as Your House
Updated: Feb. 21, 2023Composite decking, treated wood and special building techniques add up to a durable, low-maintenance deck.

- Time
- Complexity
- Cost
- Multiple Days
- Advanced
- $501-1000
Building a deck
Who says natural is the only way to go? Occasionally humans invent something that not only lasts longer than Mother Nature’s products but is easier to maintain. In this article, we’ll tell you how to use some of these materials to build yourself a deck that will last a long time, look good and be easy to maintain. We’ll also show you tricks and tips to make the building process simpler and “mistake-tolerant.”
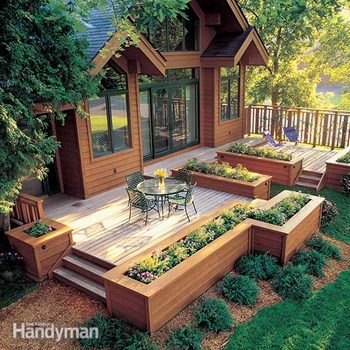
Decks are great do-it-yourself projects, and this one, big as it looks, is no exception. Although this multilevel deck looks complex, you can build it using standard tools. A circular saw, drill, tape measure, chalk line, hammer and posthole digger can be adequate for building anything from a simple 12 x 12-ft. deck to an elaborate multilevel structure. But don’t think you’ll knock this one off in a couple of weekends. This deck took 12 skilled-carpenter days to build, so if you’re new to carpentry, add a few days for the learning curve, weather delays, weekend-only work and family obligations. Realistically, a deck this size could turn into a summer-long project.
Our deck is 420 sq. ft. and cost $8,500 (in 2000) including the planters and privacy wall. Using plastic composite decking (we used Trex) instead of cedar or treated added substantially to the project cost, but when you figure that 15 years from now you’ll be vacationing in Mexico instead of replacing the old deck, it doesn’t seem so bad. For decking material pros and cons, see “The Case for Composite Decking” below.
Figure A: Main Deck and Assembly
Figure A shows the footing locations and framing details for the deck and the privacy fence. For a larger, printable version and a complete Shopping List, see Additional Information, below.
The key ingredients that will make your deck last (almost) forever
Decking: The floor bears the brunt of rot on decks. Because deck boards lie flat, water collects in cracks and knots and soaks into the end grain—especially at splices. Because these areas stay wet for long periods of time, they are the most vulnerable to decay. Although we used Trex for the decking, we chose rough-sawn cedar lumber for the privacy wall, planter trim and other exposed wood to give the project a more natural, tactile character. Because these items are largely vertical, they can be made of wood and will last a very long time.
Lumber: The wood for all the above-ground framing is .40-grade pressure-treated lumber, which will last for decades without any maintenance. Posts and planter framing that are underground call for foundation-grade .60-treated lumber, the same material used for wood foundations. Foundation-grade material may be a special-order item in your part of the country, but most lumberyards can get it for you.
Hardware: Plan on spending a few extra dollars to get quality hardware designed for outside use. That means using double-hot-dipped galvanized nails or, better yet, stainless steel nails for all nailing, and exterior-rated joist hanger nails. You can also use special screws designed for composite decking or buy hidden fasteners designed for decking, though these get expensive. Install drip cap above the ledger and behind the siding (see Photo 2). Don’t scrimp on hardware; remember that for the first time ever, the structure could outlast the hardware.
Design: Take pains to plan your deck for the long term. Think far into the future to get the size and shape right. Think in terms of a room addition more than a deck. We hired an architect and spent $500, a sum that bought us a site visit, a couple of preliminary drawings and final plans. He had numerous suggestions and ideas we wouldn’t have thought of. With the design fee only 6 percent of the total project, it was a bargain.
Footings: Make sure your footings are deep and wide enough for your climate. When you take your plans in to get a building permit, your inspector will let you know about the local requirements. Here in Minnesota, that means 42-in. deep footings, but we went 48 in. to ensure that the deck would be able to handle the next ice age.
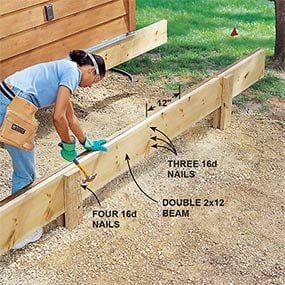
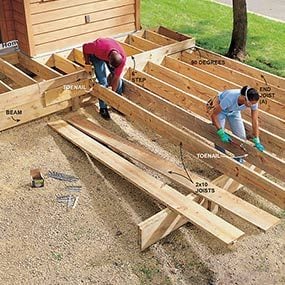
Structure: Build with shorter spans, narrower spacing and heavier materials than you would for a normal, wood deck. Our deck spans called for 2×10 deck beams and 2×8 joists, but we spent about extra and upsized the structural members to 2×12 beams and 2×10 joists to give a more beefy, permanent feel to what we expect will be an outside living room.
CAUTION!
Call 811 to locate and mark underground utilities before digging.
Digging postholes
The soil at our site was a combination of loose sand, rocks and hard clay, so we ended up using a power auger, a steel bar to loosen rocks and a clamshell-style posthole digger to extract the rock and clean out loose soil at the bottom of the hole. A drain tile shovel is great for loosening the clay at the bottom of the hole and for dislodging rocks.
Power augers cost about $70 – $90 per day to rent, and they don’t always make posthole digging a quick, easy chore. They take two strong people to run, and they bog down in heavy soil and skip over the top of any rocks bigger than a tangerine. They are, however, worth their weight in gold if you have lots of holes to dig—especially if you’re digging in sandy soil. The corkscrew end on the auger will extract the dirt more efficiently than the clamshell digger because sand falls through the end of the clamshell blades when you’re lifting the tool out of the hole. The pros usually end up hand-digging about 40 percent of the holes even if they do have a power auger at their disposal. If you choose to rent an auger, remember to hand-dig a pilot hole a few inches deep before firing up the machine. Otherwise the auger has a tendency to wander at startup and your hole might shift several inches off your layout.
Use construction-friendly building methods
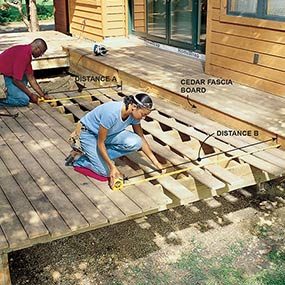
Follow the photo series for step-by-step building techniques and keep these labor-saving tips in mind when planning and building your deck.
- We employed cantilevers (beams hanging over posts, and joists hanging over beams) in our design because they make layout and construction much easier. They also give the deck a floating appearance by moving the main structural supports in from the deck’s perimeter. Cantilevering also helps by providing “fudge factors” throughout construction. They allow you to fine-tune the dimensions of the deck as you build. Non-cantilevered decks require exact placement of posts at each corner from the moment you dig your first posthole. Unfortunately, all too often you discover only after setting the posts that footing and post placement is off by several inches. You’re then faced with living with an out-of-square deck or making some very time-consuming fixes.
- Begin construction by installing the ledger board. (Don’t forget the drip cap! See Photo 2). Use the ledger for laying out the rest of the deck, including posthole placement.
- Don’t cut anything until you have to. If possible, install members before cutting them to length to give you the opportunity to make minor adjustments in the structure as you build. That means installing posts longer than they have to be, running beams longer than the deck is wide and attaching joists to the ledger before cutting them to their finished length.
- Make your deck at least 6 in. smaller than the standard 2-ft. increments of lumber. We made our 12-ft. section of deck 11 ft. 6 in. and our 16-ft. section 15 ft. 6 in. This lets you trim bad ends on deck boards, maintain a 1-in. overhang along the edges, and install cedar trim boards to hide the treated lumber framing.
The Case for Composite Decking
Decks used to be built solely of redwood, cedar or cypress because of their inherent wood preservatives. But as some of us have learned the hard way, all wood eventually rots—especially in shady, moist locations.
For many years, preservative-treated lumber has been the accepted material for a long-lasting, rot-resistant deck. But treated wood has its downsides too. Besides not being particularly attractive, it has a tendency to split, warp and twist (and those treated splinters embedded in the bottom of your hoofs are no picnic either).
There are now alternatives to conventional treated and natural wood. Various manufacturers sell different versions of plastic or composite plastic/wood decking. You’ll find everything from basic, square-edged composites to elaborate space-frame vinyl and fiberglass extrusions with, of course, elaborate prices. Matching posts, railings and trim are also available for most types. These products are not available in all areas. You’ll need to visit the lumberyards in your area to see what your choices are.
We chose Trex composite decking for this deck because of its wide availability and reasonable price. The decking material we used is the classic 1-1/4 x 5-1/2 in. shape of conventional wood decking. (Visit trex.com to see the latest colors and styles.) In addition to decking, many composites are available in a variety of non-structural dimensions such as 2x6s and 2x4s, which you can use for benches, rails or privacy screens. Composite decking is generally limited to 16-in. spans, so the joists need to be spaced every 16 in. instead of the more common 24 in. used for wood 2x6s. Composite decking can be cut and drilled and shaped just like actual wood, so no extra tools are necessary.
Composites are denser and heavier than wood. Consequently, they’re harder to haul around and a bit harder to drive fasteners into. The good news is that they won’t split, warp, twist, cup or crack—ever. The surface is skid-resistant even when wet, and you’ll get that warm, fuzzy feeling knowing that fewer trees gave their lives for your deck.
Video: How to Build Deck Stairs
Splice decking with a single seam
The typical way to handle a deck that is wider than the deck boards is to randomly butt the ends together and split them over a deck joist. Cutting and fitting all these joints takes a lot of time and forces you to butt two boards tightly together to share the 1-1/2 in. thickness of a floor joist. Nailing close to the ends makes wood split and rot prematurely because moisture gets into the splice and doesn’t dry out for long periods of time.
A more elegant, longer-lasting way is to create a single seam with a dogeared length of decking perpendicular to the deck itself. Then toenail in another floor joist for nailing the ends of the next section. Having a full 1-1/2 in. of joist for nailing each deck board allows for a space between the end of the decking board and the splice board for drying, and helps keep nails away from the splitting zone.
Figure B: Planter
Planters make a striking addition to the deck, and also create more privacy, making the deck feel almost like a separate room. For a larger, printable version of Figure B, see Additional Information, below.
Think through the rail, planter and step details or they’ll trip you up later
Most building codes call for 36-in. high guardrails on any deck that’s more than 30 in. above ground and any set of stairs that has more than three risers. Our deck had only one side higher than 30 in., so we decided to handle that area with a 5-ft. privacy wall (Photo 25) to provide a safety rail and to screen the deck from a nearby road. You can copy this design, or use the one shown in Deck Privacy Fence.
For the rest of the deck perimeter, we built planter boxes in lieu of railings (Photos 20 – 24) because we didn’t want our lake view obstructed. We also liked the idea of being surrounded by a deck-level flower garden. Frame the planters like a conventional stud wall made of foundation-grade lumber and rest them on a gravel footing. It’s important to make the planters freestanding. The lack of a frost footing means they’ll rise and fall with frost movement and will lift the deck if they’re attached to it. Don’t consider them as legal guardrails but as a passive barrier to keep people from accidentally stepping off the edge. They were designed so the tops were 15 in. above the deck to double as casual seating.
Tips for laying out and cutting deck stairs are available in How to Build Deck Stairs. We added some cosmetic side stringers (Photo 26) to dress the stair sides and decked the treads with Trex. Rest the steps on a gravel footing topped with a treated 2×10 (Photo 26) using the same setting methods demonstrated for the planters (Photo 20).
Additional Information
Required Tools for this Project
Have the necessary tools for this DIY project lined up before you start—you’ll save time and frustration.
- Adjustable wrench
- Chalk line
- Circular saw
- Cordless drill
- Drill bit set
- Framing square
- Hammer
- Handsaw
- Hearing protection
- Level
- Miter saw
- Posthole digger
- Safety glasses
- Socket/ratchet set
- Spade
- Wrecking bar
Required Materials for this Project
Avoid last-minute shopping trips by having all your materials ready ahead of time. Here’s a list.
- See Materials List in "Additional Information"


