How to Winterize a Sprinkler System
Sprinkler systems need to have all the water blown out of them before the winter freeze. If you have an air compressor you can do the job yourself and save the service fee.
Our editors and experts handpick every product we feature. We may earn a commission from your purchases.
Intermediate
Introduction
Save big bucks by blowing out the sprinkler system yourself.Tools Required
- Air compressor
- Air hose
- Quick-connect hose adaptor
Winterizing your irrigation system will keep it running better and longer. Take these steps to prepare your sprinklers for the cold season. Your yard will thank you when you can still water the lawn next spring.
Project step-by-step (5)
Compressor Set-Up
With a basic quick-connect coupling, you can use your air compressor to clear water from your sprinkler system for the winter. But, there are many different ways to connect to your system. Just be aware that even the largest home compressor isn’t powerful enough to blow out the entire system at once. But you can probably blow it out zone by zone, which is how I do it.
If you’re into number crunching and you have the original irrigation layout showing the gallons per minute (GPM) of each sprinkler head, divide the total GPM of each zone by 7.5. That’ll give you the cubic feet per minute (CFM) you need to blow it out. Otherwise, just rent a 10-CFM compressor and hose from your local tool rental center.
Set the compressor air pressure regulator to a maximum of 80 psi for rigid PVC pipe systems, or 50 psi for flexible black polyethylene pipe. Now, each system is different, but I’ve had no problems running my compressor at full volume through my black polyethylene pipe. Then turn off the water supply.
Follow the Hookup Procedure
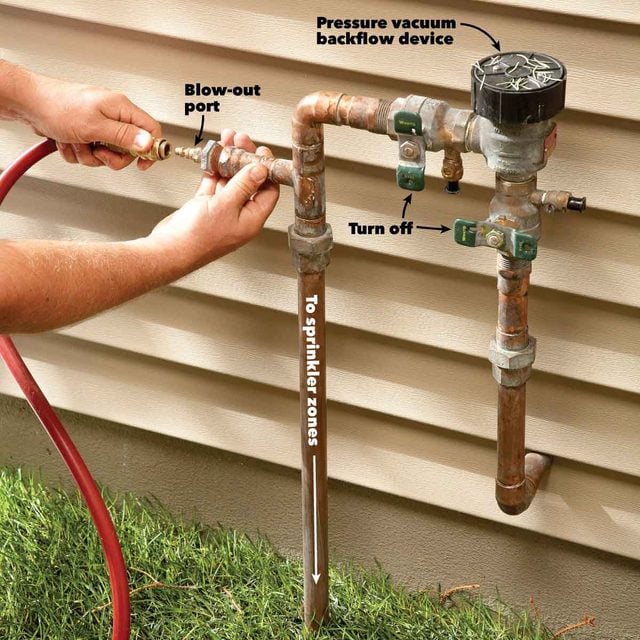
Close off both valves on the backflow preventer. This is an important step as the air compressor can damage the backflow preventer. Then remove the plug on the blow-out port, screw in a quick-connect hose adapter, and connect your compressor’s air hose to the unit. On mine, I built a quick-connect adapter that hooks up to the blow out port. I like that I can close off the valve while the compressor builds up pressure between blowing out each zone.
Blow Out the Line
Connect the other end of the air hose to the compressor and blow out the line. The heads should pop up and spit out water. Disconnect the hose as soon as they run dry. You’ll notice the sprinkler heads spitting and misting. Don’t overdo the blowout—without water cooling the plastic gears, they can melt. Once you’re done move on to the next zone and allow the heads to cool. Then go back and blow out each zone a second time. I usually do it at least three times, or until there is no more water coming out of the heads.
Turn Your Valves to 45 Degrees
When you’re completely finished blowing out all of your zones, turn all of the valves on your backflow preventer to 45 degrees. Do this on the small test cock valves as well. They’re usually smaller than the regular valves and may require using a smaller flathead screwdriver.
Shut Off Your Controller
When you’re finished blowing out each of your sprinkler zones, turn off your main controller for the winter. On mine, I switch it to standby mode.

