Utility Trailer Upgrades
Updated: Feb. 24, 2023Upgrade taillights, tow balls and connections, tie-downs and more
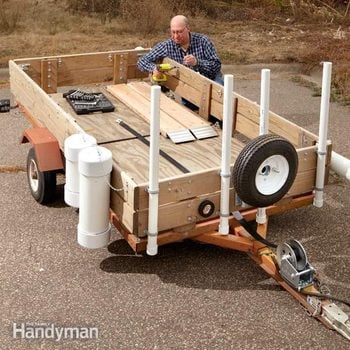
Get more value and better performance from your utility trailer. These easy DIY upgrades and add-ons will let you haul cargo more efficiently and safely, without costing you a bundle.
Overview: Trailer problems and solutions
Most utility trailers come from the factory with just enough features to satisfy local safety regulations (if any) and your wallet. Sure, they work, but they’re not very user-friendly. They rarely have factory tiedowns or loading ramps. Factory taillights usually have incandescent bulbs, which need constant replacement.
We informally canvassed about 30 trailer owners to find out what drives them nuts. Top of the list? Malfunctioning trailer lights! Followed by rusted-in-place nuts that make it impossible to change ball sizes, seized ball mounts and tough-to-tie-down trailer loads. And just about everyone wished there were an easier way to back up and line up a trailer coupler with the hitch on the first try, especially in the dark. So we did some sleuthing and came up with five cool new products that promise to eliminate these hassles.
This article contains solutions for these problems, along with a wide range of upgrades that will make your trailer-hauling jobs a lot easier and safer. We’ll also show you security upgrades that can prevent trailer theft. You can build and install most of these utility trailer accessories with just a socket set, drill, saw and screwdriver. Find the plumbing and hardware components at a home center or hardware store and the security items at any utility trailer accessories store or online. Choose the upgrades you like. Costs ranges from a few dollars to a few hundred dollars.
Trailer Upgrade 1: LED taillights
Taillights get bounced around, dunked in the lake and soaked with road salt. So it’s no surprise that bulb filaments break and sockets corrode, causing a lot of lighting malfunctions. Sealed LED trailer lights are a brilliant solution.
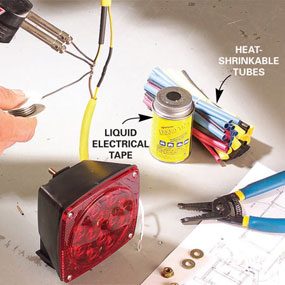
This pair of submersible LED trailer lights, which come with a wiring harness and a license plate bracket, fit right into the existing mounting holes. Before you remove your old lights, write down the wiring scheme. Then swap in the new lights and follow our wiring photos for making watertight connections.
Wiring the lights
When you install your new lights, don’t use the cheap crimp connectors to splice the wires. The crimp connectors will cause you plenty of aggravation when they start corroding a few years from now. Do the job right the first time—solder all electrical connections and seal each one with a piece of small-diameter heat-shrinkable tubing. Then seal the bundle of wires with a section of larger-diameter shrinkable tubing. Coat the ends of the larger tubes with liquid electrical tape to complete the watertight seal. Heat-shrinkable tubing assortments and liquid electrical tape are available at most auto parts stores.
Upgrade Trailer 2: Adjustable ball mount
If you own several trailers with different tongue heights or towing ball sizes, you know how hard it is to find a replacement for a rusted/ seized ball or ball mount that will fit them all. Here’s an aluminum ball mount called Rapid Hitch that can tow up to 10,000 lbs. It’s easy to adjust, never rusts and won’t seize in the receiver hitch—ever! It’s a bit pricey (about $200), but it’ll last longer than your truck or trailer. The hitch comes in three ‘drop’ sizes and several dual-ball combinations. To install, just remove the old ball mount and slide this one into its place. Buy the matching locking pin set to secure your investment. Believe us, someone will want to steal this baby.
Upgrade 3: Trailer hitch light
Upgrade 4: Handy tie-down system
No matter what you load into your trailer, it seems you’re always searching for secure spots to anchor your tie-down straps. The E-Track system eliminates that problem. Bolt the track to the trailer floor. Then snap in a variety of ratchet straps or rope anchor fittings. We especially liked the wood beam socket. Place the socket anywhere along the track and insert a board to prevent your cargo from shifting. E-Tracks are also available for mounting tie-downs to the sides of your trailer, but use them only if the sides of your trailer are metal reinforced and rock solid.
Can’t Have Too Many Tie-downs!
Did you know that poorly secured loads are responsible for more than 25,000 crashes and approximately 90 fatalities in this country each year? There’s simply no such thing as too many tie-down anchors. Hitching rings are another great upgrade to your utility trailer, and less expensive than an E-Track system. You can find them at most hardware stores for a few dollars each. Buy at least six 3/8 x 5-1/8-in. hitching rings, and mount two each in the front, middle and near the tailgate. Just drill holes in the frame (not the floorboards), insert the long bolt end and secure the threaded portion with a locknut.
Upgrade 5: Quick coupler
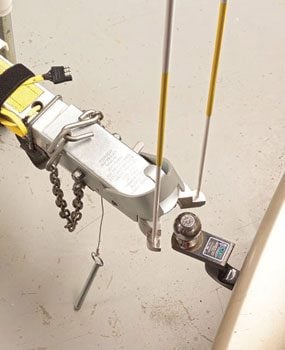
Moving an empty trailer to the towing ball is a piece of cake. But heavy trailers require you to back the truck up to the trailer. You know how tricky it is to jockey the unseen hitch into the trailer’s “capture zone.” We found a new-style coupler that has “auto-capture jaws” and alignment rods that make it a lot easier to back your vehicle up to the trailer. Simply extend the collapsible alignment rods and sight them through your back window. If you’re within 5 in. of the coupler, its jaws will automatically “capture” the ball and snap the latch mechanism closed. But make sure you get out and install the locking pin before you take the trailer out on the road.
Visit the Quickbite website to choose the right model for your trailer and to find a dealer near you.
Upgrade 6: The plumber’s trick
Upgrade 7: Add a winch
Upgrade 8: Add ramps
Upgrade 9: Yard tool holder
Upgrade 10: Vertical storage bins
7 Ways to Prevent Utility Trailer Disasters
1. Tires: Always replace trailer tires with “Special Trailer” (ST) tires (never passenger-rated tires). ST-rated tires have stronger sidewalls and are built to handle heavier loads. ST tires have a maximum life of five years from the date of manufacture. Replace yours accordingly.
2. Tire pressure: Inflate trailer tires to the pressure shown on the tire’s sidewall. Or, if the sidewall pressure conflicts with the recommended pressure shown on the trailer manufacturer’s nameplate, follow the manufacturer’s pressure recommendation. Low tire pressure is the No. 1 cause of trailer tire failure. Overloading the trailer is No. 2.
3. Lug nut/bolt torque: Tightening lug nuts or bolts to the proper torque is critical. If you’re not using a torque wrench, you’ll never get it right. The recommended torque should be listed on the trailer manufacturer’s nameplate, and it’s usually much higher than for cars and trucks. Never drive a loaded trailer with a missing lug nut or damaged lug bolt.
4. Safety chains: Always cross the safety chains when you hook up to the hitch. The crossed chains catch the tongue and prevent it from hitting the pavement if it ever detaches from the receiver. Leave only enough chain slack to allow for turns. If your chain is longer than that, shorten it. Secure the coupler throw latch with a lock or clip to prevent it from popping open.
5. Wheel bearings: Failed wheel bearings are the No. 2 cause of all trailer breakdowns. Repack the bearings at least once a year (see Repacking Trailer Wheel Bearings for step-by- step instructions). And don’t pack the hub with grease. Extra grease in the hub generates heat that can cause premature bearing failure.
6. Load placement: Place 60 percent of the weight toward the front of the trailer to prevent sway and fishtailing.
7. Lubricate the ball: If you don’t, you’re wearing out either the ball or the coupler. And that wear can cause a sudden and dangerous disconnect. Sure, grease is messy. But it’s the only way to reduce heat and wear. Grease it or lose it.
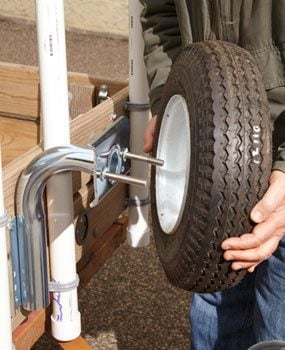
Upgrade 11: Spare tire carrier
Upgrade 12: Cargo net and D-rings
Foil trailer thieves
Really foil trailer thieves
Required Tools for this Utility Trailer Upgrades Project
Have the necessary tools for this DIY trailer upgrades project lined up before you start—you’ll save time and frustration.
- 4-in-1 screwdriver
- Adjustable wrench
- Drill/driver - cordless
- Heat gun
- Miter saw
- Safety glasses
- Socket/ratchet set
- Soldering iron
- Wire stripper/cutter
Required Materials for this Utility Trailer Upgrades Project
Avoid last-minute shopping trips by having all your materials ready ahead of time. Here’s a list.
- 1 1/2 – in. PVC with end caps
- 2 x 8
- 4-in. PVC with end caps and cleanout
- Adjustable ball mount
- Aluminum ramp kit
- Boot lock
- Cargo net
- Coupler lock
- D-rings
- E-track tie down
- Heat-shrinkable tubes
- Hitching rings
- J-hooks
- LED taillights
- LED tap light
- Liquid electrical tape
- Metal straps
- Quick coupler
- Rosin-core solder
- Spare tire carrier
- Winch

