How to Make Expensive-Looking Wall Art With a Bed Sheet

This clever DIY project will have you making the perfect abstract art piece for your home in a matter of minutes.
Our editors and experts handpick every product we feature. We may earn a commission from your purchases.
Who wouldn’t want a cool piece of textured wall art in their home? 3D art can add texture to an otherwise boring wall, jazzing up any corner of your home that needs a little something-something to bring it to life.
However, while the idea of hanging abstract wall art in your home may seem like a great idea, it isn’t always the most economical. While it is great to support artists’ work, it’s not always in the budget—especially for new homeowners who are focusing their finances on other important projects at the moment. That’s where this clever DIY textured wall art comes into play.
How to Make Your Own DIY Textured Wall Art
After watching this clever art project by TikTok user @kaelimaee, we realized this DIY wall art is actually quite doable at home.
@kaelimaee trust the process LOL i love how they turned out 🥹🤍☁️ #fyp #foryoupage #aesthetic #home #decor #diy #wallart #diywallart #texturedwallart #satisfying #minimalist #inspo ♬ Black Out Days – Sped Up – Phantogram & Speed Radio & Esteve
Here’s a step-by-step of this process, based on her video.
What You’ll Need
To make your own DIY textured wall art, you’ll need to stock up on the following:
- 2 blank large canvas boards, approximately 24×36″ or similar size. You could also paint over an old canvas you no longer use.
- Twin-size white flat sheet
- Plaster of Paris dry nix
- 5-gallon bucket
- Paint sticks for stirring and coating the sheet in plaster
- Disposable gloves
- An extra metal bowl, like this one
- Scissors for cutting the sides of the sheet when you’re finished
- A hairdryer for sealing the art on the canvas
- Picture hangers for hanging canvases
You’ll also want to create a space where this DIY project can take place, potentially in the garage or basement.
Directions
- Lay down a tarp or an old sheet in the designated area where you’ll be working on your DIY textured wall art.
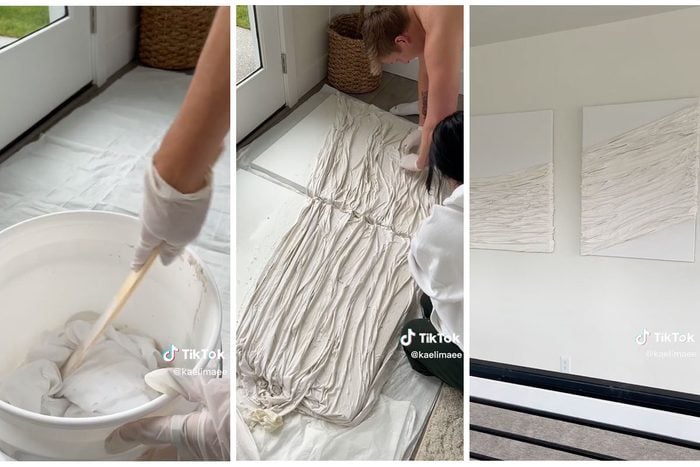
- Mix together some plaster of Paris (dry mix) with water in your bucket.
- Once the mix is ready, push down your flat sheet with a paint stick into the plaster mixture, coating it completely. You may also have to put your gloves on and mix them together with your hands to ensure the sheet is entirely covered.
- Lay down your canvas on the tarp or sheet. With gloved hands, lay down the plastered sheet across the canvas. At this point, you’ll want to shift around the sheet to get it to the design look that you’re hoping for with your artwork.
- If you need extra plaster mixture while you work, transfer some of it to a bowl to easily add to your design.
- Once you’re happy with your DIY textured wall art, cut the edges of the sheet using scissors, leaving enough of the sheet to tuck around the canvas.
- Use a blow-dryer to set the design of your DIY textured wall art.
- Once the artwork is sufficiently dry, choose where to hang your artwork. Hang them on the wall using the picture hangers. Here’s how to hang your artwork straight and level.
Safety Tips
While plaster of Paris is easy to work with, it is made of chemicals and can be hazardous to your body if you’re not careful. Be sure to avoid touching your skin and eyes with it to avoid irritation, and to wash immediately if you do. Plaster of Paris should also be used with the safety of a mask to avoid inhaling all of those chemicals, so be sure to cover your mouth and nose before starting to mix.
How to Make It Your Own
Looking to give your DIY textured wall art a little more pizzazz? While you can easily change it up by choosing different-sized canvases (and the number of canvases), you can also play around with colors by choosing a hue for your textured art that matches the aesthetic of your home. You can also frame your artwork if you aren’t keen on just having the canvas hung up on the wall.


