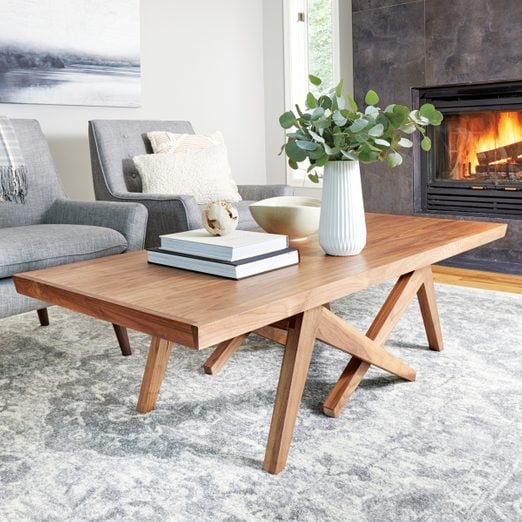
How to Build a 2-in-1 Coffee/Dining Table
Multiple Days
Intermediate
$251-500
Introduction
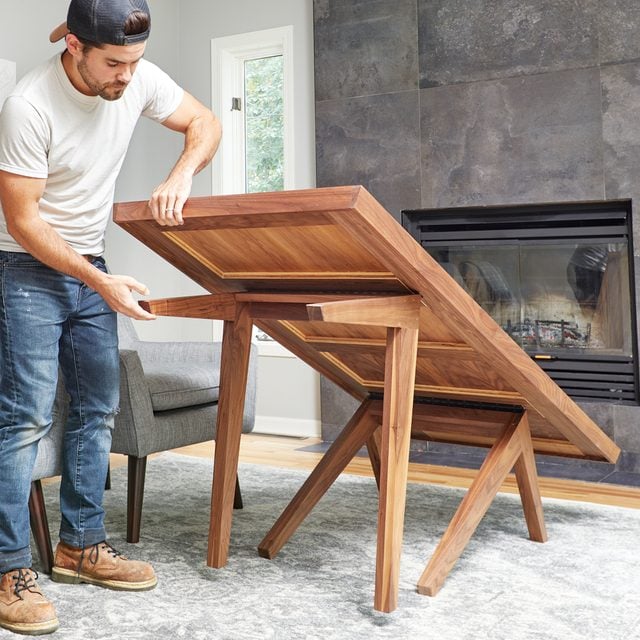
I’ve got a large family, and when we all gather it’s become tradition to haul a card table up from the basement and evict the coffee table to make more space for dining. Our next big get-together will be different. Instead of shifting furniture around, I’ll just flip up the coffee table legs and round up the kids!Tools Required
- 23-gauge pin nailer
- Drill
- flush-cut saw
- Jigsaw
- Miter saw
- random orbital sander
- Table saw
- Tape measure
Materials Required
- 1-1/2" x 4' piano hinge
- 2" trim-head screws
- 3/4" x 2" x 8' walnut board
- 3/4" x 3-1/2" x 8' walnut board
- 3/4" x 4' x 8' walnut plywood
- Glue
- jig knob set
- pin nails
- toggle clamps
A Vintage Project That Still Has Legs Today
The inspiration for this project came from an article Family Handyman published way back in 1956.
Project Reimaged for Today
I thought the idea of a two-in-one table was brilliant, even for today. I used the same hinged-leg concept but updated a few key things:
- The original article suggested using a door or solid wood for the tabletop. Plywood was available back then but in a limited range of options. Luckily for me (and you), we can now make projects faster, easier and often better with plywood.
- In coffee table mode, this project looked awkward with its large overhangs and inward-tilted legs. So I tweaked the design and found that placing all eight legs on the floor gave the table a more balanced and unique look.
- Since the legs will be swung in and out, I decided to build a half-lap joint instead of a miter, which would have to be reinforced. It also made assembling the legs much easier.
Project step-by-step (12)
Step 1
Build up the Top
- I started with a piece of walnut plywood cut to size. On the underside, glue three-inch-wide strips of the same plywood on the edges and pinned them into place.
- Put one more three-inch strip in the middle and add two six-inch-wide strips to provide a mounting surface for the legs.
- Pro tip: Doubling the top like this adds stiffness without too much additional weight.
Step 2
Bevel the Edging
- The top is wrapped with edging to hide the plywood edges. Square edging would be fine, but I cut a 13-degree bevel on the edging stock. This bevel matches the angle of the legs and gives the table a more refined look.
Step 3
Add the Edging
- Fasten the edging to the ends of the table first.
- When I added the side edging, I let it protrude beyond the bevels of the end edging.
- Pro tip: Instead of fumbling with long clamps, I used a pin nailer to hold the edging in place while the glue dried.
Step 4
Trim the Edging
- Trim the overhanging ends of the edging to match the bevel.
- Protect the wood from the saw teeth with a layer or two of painter’s tape.
- Then sand the cuts smooth and flush.
Step 5
Pro Tip: A Jig Makes Tapered Legs Easy!
To safely cut the tapered legs, you’ll need a jig for the table saw. There are simpler jig designs but this one is my favorite. You’ll just need a few scraps of plywood, a pair of toggle clamps and knobs. In 30 minutes you’ll have a great jig for this and future projects.
Step 6
Cut Slots in the Sled
- Drill two holes six inches from the ends of a sled made from a 12-in. x 30-in. piece of plywood.
- Draw lines to connect the holes, then cut out the slot with a jigsaw.
Step 7
Assemble the Fence
- Cut two slots in a two-inch-wide fence. The fence slots should line up and be perpendicular to the slots in the sled.
- Connect the fence to the sled with a pair of threaded jig knob and 1/4-in. bolts
- Then attach toggle clamps and a heel to finish the jig.
Step 8
Set the Taper Angle
- Align the end marks on the leg with the edge of the sled.
- Position the fence against the leg and lock the fence into place.
- Make sure the leg is against the heel of the fence and clamp it down.
Step 9
Taper the Legs
- Adjust the table saw fence to cut along the edge of the jig and then make the cut.
- Cut all the long legs with the same jig setup, then adjust the jig to cut the shorter legs.
Step 10
Assemble the Legs
- The half-lap joints for the legs are made by layering the leg parts.
- Fasten the parts with glue and a nailer or clamps.
- Pro tip: I built two leg sets at a time, laying them out on my workbench to make sure I got a “mirrored match.”
Step 11
Connect the Legs
- Cut another 13-degree bevel in the stretcher then glue and screw it between a pair of legs.
- Fasten a second stretcher to make a strong corner where the legs will pivot on the hinge.
Step 12
Attach the Piano Hinge
- Align ends of the short legs up to the inside of the edging.
- Position the legs with a framing square, then pre-drill and screw a length of piano hinge to the tabletop and the legs.
Originally Published: October 29, 2020


