How to Clear Clogged Drains
Updated: Feb. 06, 2023Quick results with a plunger and plumber's snake
- Time
- Complexity
- Cost
- An hour or less
- Beginner
- Less than $20
Step 1: Try the easiest solution first
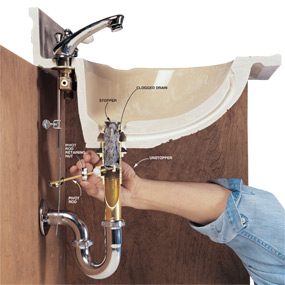
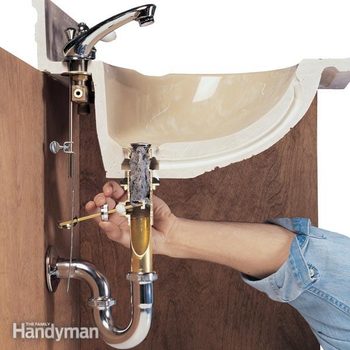
Before mounting a full-scale plunger attack, clear the mouth of the drain right at the top. Sometimes the clog is in plain sight, like a wad of hair and scum stuck to the stopper in bathroom sinks (Photo 1). You can pull some stoppers straight out and clean them off. Others only lift slightly. Peer under them the best you can. If you see any crud buildup at all, remove them (Photo 1) and clean them.
The stopper apparatus in bathtubs often catches debris too. But it’s usually easier to try the plunger solution before pulling it out (Photo 5).
WARNING
Don’t use drain-cleaning chemicals before using a plunger. The chemicals are corrosive and can splash out while you’re plunging. If you tried chemicals to open your drain and they didn’t work, let the drain sit overnight so as much water runs out as possible. Then refill the drain and put on safety glasses and rubber gloves to protect your eyes and bare skin before using a plunger.
Step 2: Reach for the plunger
Using a plunger is the simplest way to open a clogged drain without undoing any pipes. Any bell-shaped plunger will work for sink or tub drains (Photo 2). If you have the type with a bell extension, fold the extension back into the bell.
The general idea is to break up the clog and force it on down the drain. You don’t have to take anything apart. We recommend that you wear rubber gloves (although we didn’t in our demonstration photos!) and follow these plunging guidelines:
- Fill the sink with enough water to cover the plunger.
- Make sure the bell completely covers the drain hole. Seal overflow holes with a damp sponge (Photo 2), cloth or even duct tape, and other drain holes (as in double sinks) with a stopper.
- Make your first plunge a light one. Initially the bell is full of air. A hard thrust will force the air back around the seal and blow water all over the room—and you!
- Once you force out the air, plunge vigorously in and out, maintaining the seal. Stick with it, plunging 15 to 20 times if necessary. This forces water in both directions in the drain and usually breaks the clog free.
- Add water as needed to keep the bell covered. Otherwise air will get into the drain, and trying to force air through the drainpipes won’t generate much pressure.
Most of the time this is all it takes to clear the clog and restore the flow. However, if the drain remains clogged, reach for the snake.
Video: How to Unclog a Drain
Step 3: Clear the drain with a plumber’s snake
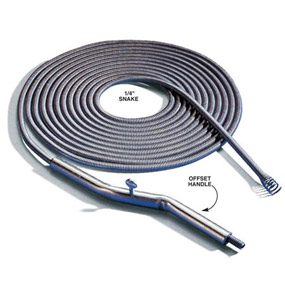
Plumbing snakes are lengths of tightly wound wire that are highly flexible so they can go around those sharp 90-degree bends in drain lines (Photo 4). A 15- to 20-footer that’s 1/4 in. thick will handle most household needs. They’re available at all hardware stores and home centers.
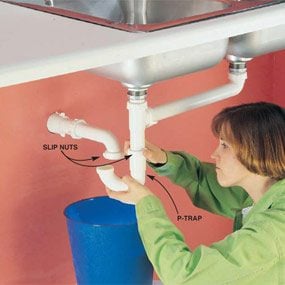
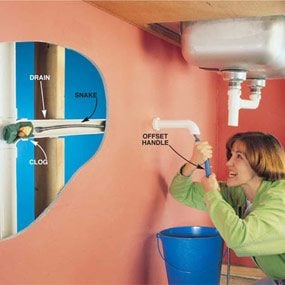
While the plunger is a 10-minute solution, expect the plumber’s snake to take 20 to 30 minutes. You’ll have to remove the P-trap under the sink first, then shove the snake down the drain, spinning it around corners and into clogs. The corkscrew tip grabs obstructions so you can pull them out. Follow these snaking guidelines:
- Uncoil the snake and lay it out straight. Otherwise it’ll suddenly spring out when you release the coil.
- Shove the snake firmly into the drain and twist it at the same time to get around tough corners.
- Turn the snake clockwise when you feel resistance so it winds into obstructions. Then pull back slightly. If you feel resistance, you’ve hooked into something. Pull it out.
- If the snake continues to make progress (extend deeper into the drain) stick with it. It’ll slowly chew through tough stuff. You won’t know for sure that you’ve solved the problem until you reassemble the drain and run water through it. So run the snake in as far as you can.
- Drains are dirty. Wipe the goop off the plumber’s snake with a rag as you pull it out.
After clearing the clog, reassemble the P-trap. Slide new washers under the slip nuts on metal traps to avoid leaks. If the trap is old and rickety, replace it with a new one while you’re at it.
Step 4: Clear bathtub clogs
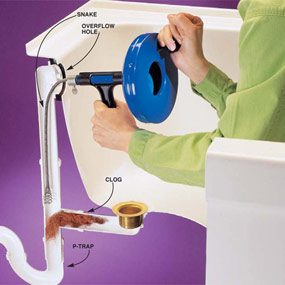
Snaking bathtub drains is a bit trickier because access to the P-trap isn’t always easy. Remove the stopper mechanism first (Photo 5), since hair and other debris often stick to it and cause the problem. (You can also get a better seal over the overflow hole for more effective plunging.) Then try snaking through the overflow hole (Photo 6). The snake should work its way through the P-trap and beyond. Remove the P-trap as a last resort. The snake we show in Photo 6 automatically coils the cable inside the drum and spins it more effectively than the snake in Photo 4.
Step 5: Troubleshoot repeat offenders
If the same drain clogs several times, chances are you have dirty drainpipes, a partial obstruction in the pipe or a poorly designed drain system. After you restore the flow, try the simplest long-term solution first.
- Add a chemical drain cleaner. These chemicals, available at supermarkets, hardware stores and home centers in either powder or liquid, are particularly effective at cleaning out hair and oils that often clog bathroom drains and the grease that clogs kitchen sink drains. Regular use will prevent a buildup. Chemicals can burn or irritate your skin, so wear plastic gloves while using them and follow the directions on the package carefully.
- Disassemble the trap, if you haven’t already done so. Clean it and snake out the drain to get at hard debris like a spoon or scouring pad that might have slipped down the drain.
- Examine the drainpipes for poor slope (less than 1/4 in. per foot), too many turns or long horizontal runs. Most drainpipes are inaccessible in walls and under floors, but if you have a basement or crawlspace, you can check some of them.
- For clogs located deeper in the system, you may need a heavier-duty snake. Or you may need to call in a licensed plumber.
Required Tools for this Project
Have the necessary tools for this DIY project lined up before you start—you’ll save time and frustration.
- 4-in-1 screwdriver
- Plunger
- Safety glasses
- Slip joint pliers
